Showing posts with label Blog Hop. Show all posts

Wednesday, 13 June 2012

Garlic-Coriander Pull Apart Rolls for Blog Hop

Well... I have to admit. I almost missed this Blog Hop due to various reasons. I really liked Renuka's blog - with whom I am paired for this month. I just didn't have the time to do anything.


Then yesterday (Tuesday), I got back from work and decided to make Garlic Pull Apart rolls. It was really nice but I will be adding more filling into it next time and maybe go easy on the flour.

I loved a few pasta dishes from her blog that I have bookmarked and will definitely make them soon. Also note that I have written this post in a hurry. So it has very less write up.


Ingredients


For the Dough
2 Cups Plain Flour
1.5 tsp Dry Active Yeast
0.5 Cup Warm Water
1 tsp Sugar
3 - 4 tsp Oil
0.5 tsp Salt


For the Filling
3 tbsp Salted Butter
5 Big Garlic Cloves - grated / minced
2 handfuls Chopped Coriander
Chilli Flakes to taste (optional)

Method
  1. Activate the yeast by  mixing it with water and sugar and leaving it in a warm place till it froths.
  2. Mix the Flour and Salt and make a well in between.
  3. Now add the Yeast & water mixture and knead into a dough adding oil in the process.
  4. Leave the dough to double in quantity.
  5. In the meantime, mix all the ingredients for the filling and keep it a side.
  6. When the dough has doubled up, punch it down and give it another knead.
  7. Divide this into 2 equal parts and roll each part separately to a thin layer.
  8. Now spread the filling on each part and roll it up like a swiss roll.
  9. Cut it into the desired size and bake it in a pre heated oven at 180oC for 25 to 30 mins.
  10. Serve Hot.

This goes to the following events:

Wednesday, 9 May 2012

Microwave Chivda for Bloghop

When Radhika sent a mail with this month's Blog Hop pairs, I was really pressed for time. I wasn't even sure if I could make something in time from Nayna’s blog. Though I loved most of her recipes, due to time constraints, I chose her Microwave Chivda. It looked very easy to prepare. And I wasn't wrong in my judgement.

I usually use the microwave to boil the potatoes, beetroot and heat up stuff. This was the first ever complete "dish" I prepared in the microwave. Due to this, I couldn't judge my microwave properly and my peanuts were still a bit "kacha" (raw). But I know my mistake now and will adjust the time / method next time. I will update this post then.


I omitted the chillies as I didn't want V to bite into a chilli seed. I added only peanuts as I didn't have the roasted almonds and cashews in my pantry. The end result of the whole dish was very tasty. Its also a healthy, nutritious and low fat snack thats perfect with alcoholic / non-alcoholic drinks and also with your evening cuppa.


Ingredients
250 gms Thin Poha (Beaten Rice)
1 tbsp Roasted Chana Dal
3 tbsp Peanuts
1 tsp Mustard Seeds
1 tsp Chilli Powder
10 Curry Leaves
1/4 tsp Turmeric Powder
1 tbsp + 1 tsp Oil
Salt to taste

Method
  1. Place the Poha in a shallow microwave dish and microwave for 3 minutes, stirring thrice in between. By the end, the poha should be crisp to bite into.
  2. Transfer this into a large bowl.
  3. In the same dish, mix the Peanuts with 1 tsp Oil and microwave for 5 minutes, stirring 3 - 4 times in between. The peanuts should be crunchy to bite.
  4. Now add the Roasted Chana Dal, mix and microwave for another 3 minutes, stirring 3 - 4 times.
  5. Transfer this to the bowl with Poha and mix well.
  6. In another microwave dish, add the 1 tbsp Oil and Mustard Seeds and microwave for 2 minutes stirring once in between.
  7. Now add the Curry Leaves to this, mix and microwave for another minute.
  8. Add the tempering, Turmeric Powder and Chilli Powder to the bowl with Poha and mix well.
  9. Store in an air tight container and enjoy with a hot cuppa.

Note: I used my microwave at 800W to prepare this.

This goes to Blog Hop Wednesdays - Week 17

Wednesday, 11 April 2012

Alu Matar - take 2

This week, I am paired with Nisha of Nisha's Kitchen for Blog Hop. She has very simple, delicious and homely food on her blog. Very comforting indeed. As I was going through her blog, I wanted to make something with potato as it had been some time since I cooked this versatile vegetable.

Our Cherished World

I am sure potato has a soft corner in most of our hearts & palates. Unless you are on a diet or watching your carbs. Even then, its difficult to resist. After searching, I settled on this Aloo Parwal Curry. The only issue was, I didn't have Parwal. So I settled for Green Peas.

The result is that I have another Alu Matar recipe - totally different from mine. Its a quick, easy and tasty dish that goes perfectly with rice and roti. Here's my recipe:

Our Cherished World

Serves: 4 - 5

Ingredients
700 gms Potatoes - boiled and cubed
1 cup Fresh / Frozen Green Peas
1 Onion - finely chopped
1 Tomato - finely chopped
2 Green Chillies - finely chopped
1 tsp Ginger Paste
1 tsp Garlic Paste
1 tsp Cumin Seeds
1/2 tsp Red Chilli Powder
1/4 tsp Turmeric Powder
2 tbsp Oil
Salt to taste

Method
  1. Heat Oil in a pan. When hot, add the Cumin Seeds and let them splutter.
  2. Add the Onion and Green Chilli and fry till the Onion turns golden.
  3. Add the Ginger & Garlic Pastes and fry till the raw smell goes.
  4. Now add the Tomato, Salt, Red Chilli Powder and Turmeric Powder and cook till the masala comes together.
  5. Add the Potato and Peas and cook till the peas are cooked.
  6. Serve hot with rice / rotis.
Our Cherished World

This goes to the following events:
Radhika's Blog Hop Wednesdays #16
Ayesha's Healthy Morsels - Pregnancy
Priya's Healthy Diet Event hosted by Vardhini

Our Cherished World Our Cherished WorldOur Cherished World

Wednesday, 14 March 2012

Soya Kheema Burgers for Blog Hop

I had a packet of Dry Soya Kheema in my cupboard from quiet a long time. I wasn't sure how to use Soya Kheema. I was searching for a Soya Kheema cutlet recipe to use it up. Al l the recipes I found used Soya

When Radhika paired me with Vaishali for this month's Blog Hop and I opened her blog, the Soya Kebab was on the first page. And it was using Soya Mince. Coincidence did you say??? Too much of it... So unlike other Blog Hops, there was no thinking twice as to which dish I would be making.

Tikkis in the pan
That said, it would've been tough to decide what to make from her blog if I hadn't been looking for this recipe for so long. All her recipes are drool worthy. Her crafts are very innovative and pretty. A special mention to her Floating Rangolis. I definitely want to try them for the next Diwali if I get a chance.

Another special mention has to go to her kitchen. So neat and so well organised. Vaishali, you've inspired me. If and when I move back to India and get to design my kitchen, I might use some of your ideas. Absolutely loved the practicality of it.

Coming to the recipe, I didn't use paneer or green chilli paste in it. I've also adjusted the spice measurements according to our taste. As you can see, I've assembled it in a different way as well.


Here's my version of it:

Makes: 3 burgers

Ingredients

For Tikkis
1 cup - dry Soya Mince
1 - big Potato - boiled, peeled and mashed
1 tsp Ginger Garlic Paste
1 tsp Kasoori Methi - crushed between the palms
1/2 tsp Garam Masala
1/4 tsp Chat Masala
1/2 tsp Chilli Powder
1/2 tsp Coriander Powder
1 tbsp Bread Crumbs
Salt to Taste
2 - 3 tbsp Oil (to shallow fry)

To Assemble
3 burger buns - cut in half - I used whole wheat
Tomato Ketchup / Hot Sauce
3 Cheese Slices (Vegans can avoid this)
1 Red Onion - chopped

Method

For Tikkis
  1. Place the Soya Kheema in a bowl and pour boiling water over it till its fully immersed.
  2. Leave aside for 10 mins
  3. In the mean time, add the mashed potato and the rest of the ingredients (except Oil) under "For Tikkis" to a bowl.
  4. Once the soya is cold enough to handle, squeeze the water out of the mince and add it to the potato and mix well.
  5. Make tikkis of desired size and keep aside.
  6. Heat a pan, add oil and shallow fry the tikkis.
  7. Once done, start assembling the burger.
To Assemble
  1. Apply Tomato Ketchup / Hot Sauce on both sides (insides) of the burger buns.
  2. Spread about a table spoon of chopped onion on the base of the burger bun.
  3. Place the tikki on the Onions.
  4. Place the Cheese slice on the tikki.
  5. Close the burger and enjoy.

This goes to the following events:

Radhika's Blog Hop Wednesdays


Kokila's Dish it out – Sandwich / Burger that was started by Vardhini


Kalyani's Holi Fest – Colourful Palette


Wednesday, 8 February 2012

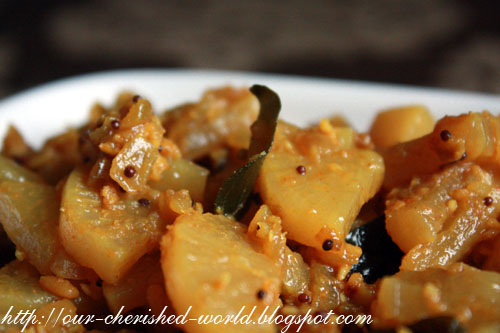
Radish / Mullangi Fry

Its amazing to see and learn the difference in the different cuisines in India. Even simple thing is so different. The best example is this Radish Fry that I picked up from Summe's blog with whom I am paired for this month's Blog Hop.


I never heard of Radish fry until I saw this recipe in her blog. For me Radish is ONLY to be used in Sambar. I don’t remember having it in any other form / dish.

In our house, for every vegetable fry, dry red chillies and cumin seeds are a must. I was surprised that Sumee didn't use either. Also, she used Coriander Powder which is not used in our house. Curious to know the taste, I decided to try it out. I am so glad I tried it out. We totally relished it. We had guests over the weekend and they enjoyed it as well (atleast they told me so).

I didn't use jaggery and crushed garlic instead of mincing it. I also changed some measurements. Here's my version.


Serves: 4 - 5

Ingredients

2 Medium (approx 600gms) White Radish - chopped to bite sized pieces
1 Onion - finely chopped
4 Garlic Cloves - crushed
1 tsp Red Chilli Powder
1/2 tsp Turmeric Powder
1 tsp Coriander Powder
2 tbsp Grated Coconut
1 tsp Mustard Seeds
1 tsp Urad Dal
1 sprig Curry Leaves
2 tbsp Oil
Salt to taste

Method
  1. Heat Oil in a pan and add Mustard Seeds.
  2. Once they splutter, add the Urad Dal.
  3. When it starts changing colour, add the crushed Garlic and fry it.
  4. Once the Galic turns golden brown, add the Onions and Curry Leaves, mix and fry till the Onions turns golden.
  5. Now add the Salt, Turmeric, Red Chilli and Coriander Powders and mix well.
  6. Then add the Radish, mix well and cover and cook.
  7. Keep tossing the Radish and add a few table spoons of water if necessary.
  8. Once the Radish is almost done, add the Grated Coconut, mix and cook till Radish is done.
  9. Serve hot with roti / rice.

Do check out what the other Blog Hoppers are doing this month.

Wednesday, 11 January 2012

Chicken Pepper Curry for Blog Hop Wednesdays

For my first Blog Hop Wednesday, i was paired with Vidya of Kurry Leaves. Her blog was a difficult one - so many yummy recipes with yummier photos.


After much deliberation, I chose her Chicken Pepper Fry. It was as good as her photos. The best bit was, when P tasted it, he told me its something similar to what he used to eat when he was a kid. He didn't remember who used to make it but he was quiet happy. I am glad I chose that recipe.

I made minor changes to the recipe. I added more onions & tomatoes to get a little more gravy. I didn’t brown the onions. I just let them turn transparent. I also adjusted the pepper powder to suit our taste.

Here's my version of the recipe:


Serves: 4

Ingredients
1 Baby Chicken – cut into bite size pieces
3 Large / 5 Medium Onions – Finely Chopped
3 Tomatoes – Finely Chopped
1 Tbsp Ginger Garlic Paste
1 tsp Chilli Powder
2 tsp Coriander Powder
1/2 tsp Turmeric Powder
1 tsp Meat Masala (I used Shan Meat Masala)
1/2 tsp Garam Masala
1 tsp Pepper Powder
1 Sprig Curry Leaves
2 tbsp Oil
Salt To Taste
Chopped Coriander Leaves for Garnish

Method
  1. Heat the Oil in a pan. When hot, add the Onions and Tomatoes and fry till the Onions turn transparent.
  2. Now add the chicken and cook till almost done.
  3. Now add the Ginger Garlic Paste, Chilli Powder, Coriander Powder, Turmeric Powder, Meat Masala, Garam Masala, Pepper Powder and Salt and mix well and cook till the Chicken is done.
  4. Add the Curry Leaves and mix well.
  5. Add the Chopped Coriander Leaves, mix and serve hot with rice / roti.

This is my entry to Radhika's Blog Hop Wednesdays - Week 13